Showing posts with label Holidays. Show all posts

Monday, January 10, 2022

How to know you need a new hairstyle and other tips for January.

 Cleaning up and clearing out always happens this time of year.  While tidying up in the craft room, I found this list scrawled in a notebook.  I'm pretty sure I wrote this while I was waiting for a train or a bus. 

You know you need a new hairstyle when...

  1. Your Mum says "I like how you've done your hair today!"
  2. Your Nana tells you that your hairstyle makes you look "very smart".
  3. You can't see anything because your hair is in your eyes.
  4. Your mates are calling you Rapunzel.
  5. People compare your hair to that of any bloke famous for being in a band! 
I'm guessing if you experience 1 and 2 you probably aren't experiencing 3, but it's possible.  Meanwhile this was a good reminder to book in a hair cut before school goes back! Eek. 

What else do I want to get done this month? 

  • Clean out my wardrobe, 
  • Tidy up my bedroom, 
  • Declutter and Donate DVD's and other items I am not using anymore. 
  • Get some workouts planned out and ready to go.
  • Exercise.
  • Get all those medical check ups and check ins done- you know the dentist, the optometrist, the chemist and the vet. 
Wish me luck! 


Friday, July 26, 2019

Almost time to Party... Harry Potter's Birthday!

31 July is Harry's Potter's Birthday! So, to get you in the groove for some Wizarding Fun, let's check out some of my favourite ways to celebrate everyone's favourite magical orphan.

1. Face paint... Last year, I spent Harry Potter's Birthday, with a black lightening shaped scar 'painted' on my forehead.  Can you believe my colleagues felt no need to join me?


 2. Make sure your friends know it's time to party.


 3. Get your invisibility cloak on and....


4. Play some Hogwarts Inspired Games....


Check out these links for more ideas of Harry Potter Games to play.  

5. Be Proud of your Harry Potter Obsession


6. Decorate..

Click here for more ideas for decorating an Epic Harry Potter Party. 

7. Have some sympathy for Voldemort.... 


7. Remember.... 


AND.....

BUT... some life choices need to go a bit further than.... 


What are you doing on Harry Potter's Birthday? Let me know in the comments.  


Friday, June 28, 2019

Aunties' Day is Coming!!!!

It's so exciting!

It's one day a year when career women with no kids will be honoured for the massive impact they have on the lives of their nieces, nephews and other young people they know.  Save the Date People...

Sunday 28th July 2019 is Aunties' Day!!

You better get organised too. Your Aunties and Uncles must be loved beyond measure on 28 July and that takes some doing.

Here's a list of reasons your Aunty deserves a day! 

Here's a list of gift ideas and ways to celebrate! 


Need some more ideas?  Check these out...

1. Skype and FaceTime with your Auntie (and/or Uncle) to say I love you!
2. Write Auntie a letter telling her why she is awesome!
3. Organise for Auntie to have dinner with her friends.
4. Know your audience... if Auntie doesn't cope well with surprises, then don't surprise her!
5. Give her your undivided attention!  That's what she gives you.  Give some of it back!!

Love your Aunties!
They Love You!


Thursday, April 25, 2019

ANZAC Day 2019


Today is ANZAC day.  This is when Australians and New Zealanders commemorate the landing of our soldiers on the beaches of Gallipoli (Turkey) on 25 April, 1915.  Many Aussie's will find themselves at a March today.  Whether they are marching with an organisation, wearing medals earned by their grandfather's or waving a flag at the side, it's all important.  It's an important part of our culture because we remember a significant day in our Nation's history.  Many will also find themselves at the pub today, especially those who have been to war.  You see, today they go to the pub with mates who went with them.  They drink to peace and have another one for their fallen brothers.  Then, they have another.  


I don't know what it's like to face an enemy, watch a friend die beside you, endure torture, come home to a different world and start life again.  I don't know anything about it.  I just know that I'm very grateful for those soldiers who went to war on my behalf. I have tremendous respect for the men and women who serve their country as part of our defence forces today.  I am in awe of them.  

Today, I won't be marching.  I won't be waving a flag.  Today, I will be praying for peace.  

Below, the poem written in 2013 and edited in 2016 is republished, so it's about time we revisit it. Take a moment to "remember them" today.   


Thank you for the ANZAC 

(ANZAC DAY 2013)


Thank you for the ANZAC
Thank you for the boys
Who bravely disembarked the ships-
Ambushed on Turkey's shores.

Thank you for the soldiers 
Thank you for those kids
They volunteered, to us defend
Our freedom-never stripped.

Thank you for their courage
Thank you for those men
Fighting for freedom and for peace
Their stories ended then.

Thank you for Survivors
Thank you for their safe return
They tell us of their hell on earth
From this, we hope to learn

We are very lucky
We never will forget
The sacrifice of millions
For Peace - we don't have yet!
Lest We Forget


Friday, April 12, 2019

Postcards from... Biloela

Good Morning Friends, 

You are probably wondering, 'Where on Earth is Biloela?"  You're not alone.  In fact, I didn't know (nor did I care that much), where it was.  I had no desire whatsoever to visit this little Mining Town, south west of Rockhampton.  That was, until my sister and her husband packed up their bus, kids and two dogs to move here.  Now, I'm happy to take a 6 hour drive through country Queensland, just to see them for a few days.  My sister is a lucky lady.  I wouldn't drive that far for just anyone's 40th birthday.  Her present is My PRESENCE! 

Let's check it out on the map.... 


It's a beautiful place and the people I have met so far are kind and have a great sense of humour.  You have to have a good sense of humour to have a conversation with me.  He he he.  Check out this website for more info about this country town.  

Here I sit, at the small table in the ensuite 'villa' (read: converted container where sitting at the kitchen table is also sitting on the bed), tapping away on the keyboard and listening to a gameshow re-run on the TV (which is perched atop the fridge).  We went for a walk this morning and had breakfast at one of the two bakeries in town.  Now, I'm ready for a nap.  
Callide Dam


We have a big weekend planned.  Today, we are babysitting.  We're hoping to check out the famous dam and take the kids to the art gallery.  At some point, my brother-in-law will take me out for 'coffee', I hope.  Tomorrow we have a birthday party for my niece who is turning 5 in May.  Yes, I know we are very early, but the birthday girl wants me at her party so she has to have it when I'm in town.  I will tell you all about the party over the coming weeks.  Stay Tuned for that. 

On Sunday we are having lunch with my sister for her 40th Birthday.  :) On Monday, we are heading home!  Then we will need a real holiday!

Next week, I will have some "Road Trip" tips for people with Chronic Pain and their carers.

Do you want to know what craft supplies I packed for this epic 5 day hiatus from my craft room? If you were going away for a few days or a week, what would you take with you? Would you take anything? More on that later.  

Happy Weekend! 

Thursday, February 14, 2019

A Great Day to Be Kind

I'm publishing a day early this week, to celebrate Valentine's Day!!

I used to think Valentine's Day was really important.  It was a wonderful opportunity to be told I was loved.  After I separated from my husband I found Valentine's Day difficult.  When in another relationship, I didn't want to make too much of a fuss on Valentine's Day.  By the following Valentine's Day, I was alone, yet again. I was back to thinking that Valentine's Day was a silly waste of everyone's time.

The commercialisation of the day irks me a little. Today, I'm not going to go on a rant about the ridiculous behaviour and amount of spending that people indulge in on this particular day.  Instead, I have something else to say...

True Love can not be expressed in a greeting card 
or the purchase of chocolates and flowers.  
True Love is more than words and money.  
True Love is rare.  True Love is more than sex or romance. 
True Love is a thousand acts of kindness, a million choices 
to serve or sacrifice or simply be second.  
True Love is yours if only you will share it.  

Okay, one last thing...

Today, by all means, celebrate the ones you love and show them what they mean to you, but more importantly, Be Kind.


It's quite simple really, so simple that you can do it everyday! Be Kind. 

Just, Be Kind.  

You can be Kind.  I know you can.  Just do it.

Be Kind Everyday!

Monday, December 31, 2018

This Year I... (a list)

This Year I have reached my goals!
Here's a run down of what I have achieved and what I'm planning for next year.

This Year I …
  • lost 6.5 kg! 
  • met the best version of myself.
  • developed a habit of regular Bible reading and memorisation.
  • gave up soft drink.
  • found an exercise program that actually works for me! 
  • planned meals and started cooking again.
  • learned new card making techniques.
  • relaxed.
  • FINALLY moved my craft room - I need to set it up better and add a few things here and there, but I can create in there and it's wonderful. 
  • updated my wardrobe.
  • moved forward.
  • taught new subjects and survived.
  • stood up for myself.
  • adapted to new situations.
  • supported other people. 
  • rested.
  • set goals and achieved them. 
  • connected with my family.
  • shared my story with my church... I needed to do that and I can't believe I hadn't done that before. 
  • made new friends. 

Next Year I plan to:
  • set up my craft room, workspace, reading nook and fitness space, 
  • find a name for my new multi-purpose space that doesn't sound like it's part of a school. 
  • spend more time with my friends.
  • find ways to serve my church more and follow through. 
  • apply for new jobs.
  • have fun. 
  • create every week. 
  • exercise every week.
  • eat good food.
  • lose weight.
  • be the best version of myself by taking care of myself. 
That's that then
See you in the New Year!

Friday, December 28, 2018

Almost the End of the Year

Wow, the last week went quickly.  
Visiting relatives, attending church, volunteering, more church services, wrapping gifts, cleaning, Christmas Eve traditions, the BFF's Birthday and Christmas celebrations, opening gifts and family fun have kept me busy! I almost forgot to write and post today.  

I've really been enjoying hanging out at home with my mum.  Don't tell her that.  

Our Christmas Day was wonderful. I woke up early, (thanks to Shelly) and went for a walk around the neighbourhood. It was nice to be outside and have a chat with God as I walked along.  I to the end of my street and smiled as I heard children calling out to their parents, or squealing with delight as they opened their presents. I also did a lap of the park.  It was quiet there. When I got home, I woke up my Mum so we could have breakfast together and exchange gifts.  Then we got dressed and headed off to church.  It was so nice to see my Church family and worship together with them on Christmas day.  There were several years when I didn't get the chance to do that and I really appreciate it when I can.  Mum and I had lunch at the local Football club, which was delicious.  We drove along the beach and then spent the afternoon watching Christmas movies and playing board games.  We both managed to fit in a nap too. It was low key and absolutely perfect for me.

While there are a few things I would have liked to do, I did everything I needed to do. 

Today, we will have a "Christmas Lunch" gathering at my sister's house and exchange gifts with my nieces and nephews.  I am excited to spend the day with them, eating, playing games and just enjoying each other.  That's what family gatherings should be about, in my opinion. 

What are you doing during this crazy week between Christmas and New Year? Working? Sleeping? Reflecting? Planning? Looking for a Calendar? Let me know in the comments. 

Merry Everything

Friday, December 21, 2018

This is Christmas?


So, this is Christmas

We all look around at his time of year for something magical.  Unless of course we are a mother or wife or self-appointed elf; then we are too busy trying to create something magical. 

In 2016, I determined to make Christmas extra special because I knew it would be the last one my father would spend with us.  I was right, of course, because he died only a few weeks after Christmas.  He didn’t want to miss out on the presents! I ask you, what do you buy a dying man?  No, really, I’m asking. I cannot for the life of me remember what I gave him.  I decorated the house, wrapped presents, made a scavenger hunt for the kids and helped put together an elaborate table setting with my mother.  All the while, caring for my dying father.  I don’t know how I managed to buy and wrap all those presents, either. 

In 2017, I was also determined to make Christmas special, because it was the first one without Dad.  I made sure to decorate, I helped Mum gather table centres and settings to take to my sister’s house.  I got hydrated and went Christmas shopping, then I came home and wrapped everything.  I bought gifts for everyone including the pets.  Especially, Shelly!
Oh no- I just remembered a pair of cats who I forgot to buy gifts for!  ☹ I usually make their gifts.  I’m not sure I have it in me this year. 

In 2017, I was hell bent on creating new traditions and I worked at making the holiday meaningful, Christ-centred, spent with family and fun.  I tried my level best to make it easier for me and my mum to not just survive it but enjoy it.  I did okay.   

This year, I am tired.  I want Christmas to be practical and pretty.  I want Christmas to be meaningful, on a whole new level.  I don’t want to waste money on junk or items that no one really needs.  I am also a little bit sad.  In a way, doing Christmas without Dad is harder this year.  I don’t know why.  My sister doesn’t want us to buy ‘crap’ for Christmas.  Those were her actual words.  Yes, thank you, I buy crap for my nieces and nephews.  That’s what you think of all the gifts I have purchased over the years for them.  Don’t get me started on my sister. 

This year, I have gone Christmas shopping and bought a few small items for my nieces.  I am giving money to my older nephews and nieces as per their requests.  I bought a few things for myself and told my Mum she can wrap one of them and put it under the tree if she likes.  I am giving my mother an experience – sounds scary, doesn’t it.  I decided it was time to start another new tradition.  I will tell you more about that, a little closer to Christmas.

What’s that you say?  It’s only 4 days until Christmas.  Wait, what? 3 days until Christmas?! No, it can’t be!

Um, I gotta go.

Christmas Love

Monday, December 17, 2018

More Christmas Cards

I love making cards and I love trying out new techniques to see how I can stretch my supplies.  If I can do that, I don't need to buy as many products.  Nice! So, I couldn't put away my Christmas stamps, dies, embossing folders or ink colours, before making a few more cards, just for fun.  

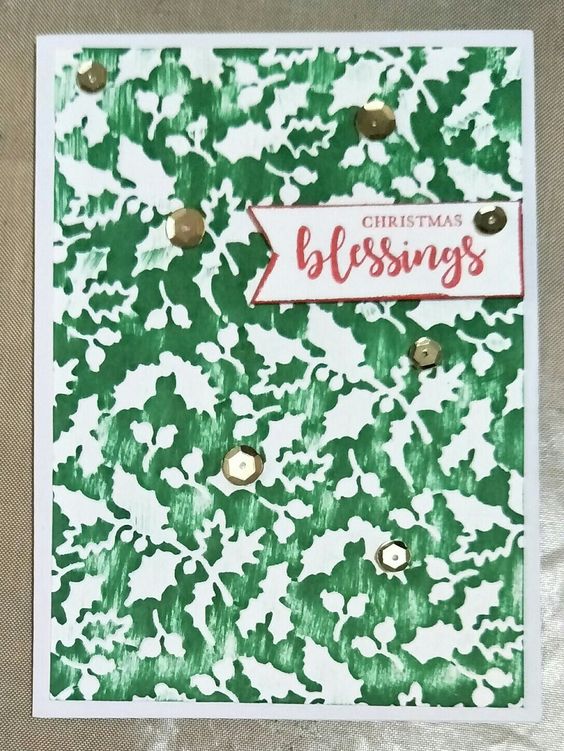
I want to start by showing you two cards.  I used the same embossing folder but changed up the ink that I used.  I love both cards and  I will definitely be doing this again. I watch a video by Jennifer McGuire where she used ink in embossing folders and ran them through a die cutting machine.  I followed her instructions to make this card.  

I'm not sure if I didn't roll it through enough times, or if I didn't use the right ink.  I used CP's Grass Skirt ink and maybe it has a different formulation to the inks that Jennifer recommended.  If you have read my card posts before, you will know that I LOVE Catherine Pooler inks and stamps so I'm not saying anything negative about her inks.  I'm just saying that this technique is maybe better suited to other inks. I still love the look of this card and I will be sending it to a friend.  

While falling down a You Tube rabbit hole, I stumbled upon a video by May May Made It (she's so down to earth and so much fun).  She demonstrated a similar technique where you use the embossing folder and run it through your die cutting machine first, then drag the ink pads over the embossed card stock.  I figured I would give it a try.  Here's what I made.  

The same embossing folder from Kaisercraft, 
but I used Cottage Ivy from Memento Inks.

Video from May May (click to see the video). 

I absolutely adore the look of this technique!  It's so lovely.  I can't wait to try this technique with all of my other embossing folders.  Stay tuned for that in the New Year. 

This card was inspired by one I saw on Pinterest - click here to see the original. 


Images are from the Spot On stamp set by Catherine Pooler
Sentiment stamp from a set by Kaisercraft
Ink Colours are Grass Skirt and Rockin' Red by Catherine Pooler

This set of cards was created using just two stamps! Both stamps were part of FREE sets that came with a Stamping Magazine.  I'm sorry, I don't remember which ones they came with.  I glued my card panels onto some red card bases I had in my stash.

I used Memento inks on these cards
Rhubarb Stalk and Cottage Ivy. 
Just in case you're wondering, I used Versafine Black Onyx pigment ink for most of the sentiments on the cards in this blog post.  

Lastly, I made this card in less than 10 minutes! I used the left over stars from my bulk Christmas card set.  I swiped my Paris Dusk Ink (by Memento) across a card panel to make my night sky and stamped a sentiment in the bottom left corner.  Then I used some multi-medium matte glue to stick on my stars.  I smooshed some of my ink on to my craft mat and sprayed some water on it. Then I flicked it onto my card panel and base.  Before gluing the card panel onto the base, I used a silver gel pen to put some tiny polka dot stars all over the background.  Then, I stamped a sentiment inside my card. Done! :) 

It was quick, easy and fun. I love those cards.  Gluing on the stars was probably the step that took the longest.  Now, I have to work out who will receive this card from me.  

That's that then! 
May visions of sugarplums dance in your head. 

Friday, December 14, 2018

Christmas Cards - Batch Card Making

Cards and Tags are still popular at Christmas Time. Some card makers start making their Christmas cards in July.  I am not one of those card makers! Some make 20 or 30 or even 50 of the same card then send them on out.  Some card makers like to make five or six of each design and make several different designs.  The easiest way to make lots of Christmas cards is to buy a pad of patterned paper, cut and stick.  Choose a simple sentiment and go for it.  

If you are searching for some Christmas Card inspiration, you might want to check out these videos... they certainly helped me work out what to do. 


Last year, I got a bunch of Christmas stamps and a few dies and just made a few cards as I felt the need.  I think I ended up making about 10 or 12 cards.  However, as it got closer to Christmas and I got better at pulling together Christmas cards, my mother started thinking of people to whom she wanted to send cards.  This meant that  I would put away all my Christmas stamps and then have to pull them all out again.  The struggle was real! 

This year, I decided that I would design one or two simple Christmas cards that would be easy to mass produce.  I told my mother that I was making 20 cards this year and if we ran out, she would have to use some cheap packet cards we bought at the discount store a few years ago.  I am not making last minute cards.  You ready to see the magic? 

The winning design for my bulk set of cards. 
The key to making so many cards, efficiently is to plan out the card (and even make one- just one). I made three different cards and showed my Mum and a few of my crafty friends.  Between us, we decided on the best design.  I then wrote a list of all the steps needed to make that card.  I listed all the measurements of card stock and all the materials and tools I would need.  I got out a box and put everything I would need into the box.  I tidied up my craft space so there wasn't anything in my way.
  
Time to start creating.  I cut all my cardstock.... enough for 25 cards - just in case I messed up.  I created a mask and started ink blending all my Christmas Trees- I did 20 card panels like this.  When I finished ink blending each panel, I brushed some Perfect Pearls pigment powder over the triangle, before removing the mask and going to the next panel.

I used post-it tape to mask off a triangle just 
off-centre.  I used the squares on the tape to 
make sure the triangle was straight. 

As you can see, I used Lime Rickey and Grass Skirt inks 
from Catherine Pooler Designs to make the tree shapes.  
Next, I stamped the sentiments on the front.  Using my stamping tool made this so easy and quick.  I used Rockin' Red ink from Catherine Pooler to stamp my sentiments (which were from Kaisercraft). Next was more ink blending around the border.  Then, time to emboss all the panels using an embossing folder - 20 card panels, one after another = tired elbows.  Before putting away the Cuttlebug, I die cut 40 little stars.  Actually, to tell you the truth, I asked my Mum to do the die cutting and embossing.  Considering that she will use most of the cards, she was happy to help.  Then I stamped sentiments on the inside of the cards.  Finally, they were ready to assemble.

Embellishing these cards was the most fun part! You can add sequins, twine or washi tape on the card to go behind the card panel.  Use glitter, enamel dots, Nuvo Drops, glossy accents or whatever you have.  I simply stuck my stars onto the top of each tree.  I played with placement of sequins on a few cards, but in the end I decided I liked them without the extra stuff.
So much for my tidy workspace! Lol. 
Mum loves these cards and so do I!  It's hard for us to find a design that we both like so much.

Just to be on the "safe side", I made a few other cards.  I wanted to try some designs that I saw on Pinterest and I wanted to try out some techniques that I was sure would look gorgeous with Christmas supplies.  There will be a bonus post for you in a few days, showing you the other cards I made.  Here's a sneak peek.
Have a Crafty Day

Saturday, December 8, 2018

Christmas Party BINGO!!

We all have to attend at least one! It might be with family, or work mates, neighbours or, if you're really lucky, friends.  Some of us love these social gatherings!  Some of us, would rather be in our PJ's, eating gingerbread or popcorn or chocolate while you watch Die Hard.  If this is you, I have a great game you can play, with your friends (even if they aren't at the party) and inject a bit of fun into the holiday festivities.

It's Christmas Party BINGO!
Click save as on the image above for your own copy OR you can create your own.  It was really easy.  Just create a 5x5 table in Word (landscape orientation) and fill in the squares with events, objects, names or other things holiday related.  Here are some variations of playing this game.
1. Everyone gets a bingo board and the first to tick off 5 in a row (in any direction) wins.
2. Write a date and time in each square so you know who really did see grandparents first!
3. For the square to count, a player needs to send a photo/ video to all the other players.
4. If bragging rights aren't enough to motivate your mates, have everyone donate something to a prize pool.
5. Mix it up by requiring 5 squares that aren't touching or the FREE square has to be included.  You could make it 4 in a row or the whole board.
6. Play like tic-tac-toe.  You play on the same board so opponents can block you from earning the square if they get it first.
7. Play it with a friend and just laugh!

Christmas can be a difficult and tiring time for many people. It's supposed to be the most wonderful time of the year, so if you're dreading the thought, go on - right click.  Choose some relatively harmless silliness.

It's completely fat free... you don't have to eat the gingerbread!  It doesn't have to cost you a cent.

Next Week: Check out how I make a batch of Homemade Christmas Cards.

…. and to all a goodnight!


Friday, October 5, 2018

World Card Making Day 2018!

Did you even know this was a thing?
Me neither.  At least, not until last year when my Aunty hooked me up.  ;) Thanks, Aunty Crafty (see what I did there?).

World Card Making Day is the first Saturday in October, every year.  Who knew? Lots of stamp and crafting companies have big sales to celebrate! The card makers of the world, unite (let me say, they are often found in groups, so uniting isn't a great stretch for them, ha) and celebrate the joy of paper crafting.  I would add, that these people celebrate every time they get mail, so they're really good at it! Everyone in the world can send a handmade card in October.  It doesn't have to be as gorgeous as mine (stop, I'm blushing) you can knock something up with markers and construction paper.  It's the thought that counts.

It's not news to the regulars around here that I make cards.  I fit into all of those card maker stereotypes.  I also love crafting at home, in the quiet and sometimes I celebrate when there isn't even any mail.  However, I have to admit, I love sharing my insane love of paper and ink and pretty things with others who understand me. I also love introducing people to the craft and teaching them all about it.  That could just be the teacher in me who loves to boss people around.  Lol.

Anyway, you didn't come here to hear me rant about how much I love the smell of freshly trimmed cardstock in the morning.  Oh, how I love it.  You want to see some cards... right?

My First Shaker Card


I will admit that I practiced this before I did the real thing. Nope, I'm not going to show you the disaster that preceded this triumph.  This was high pressure, as I wanted it to be just right and (of course) things didn't go exactly to plan.  However, I'm very pleased with myself.  I used Lawn Fawn's Year Two stamp set for the sentiment and the Dare2BArtzy Soccer stamp set for the "1".  I performed a bit of stamp surgery... it's okay I used anaesthetic... to cut the number away from the hashtag.  It fits back together perfectly and I have used it in both forms since making this card and it's all fine.  Chill.

The background is a patterned paper I bought about a decade ago (no, I don't know the name of the paper pack or where I bought it). The shaker elements were an assortment of sequins from various places that I just had in my stash.  Most of them were from my local discount variety store.  For the acetate part of the shaker, I used an old overhead transparency.  My mum brought home a big pack of about 200 from her work, instead of throwing them in the bin.  I have enough acetate to keep me busy for a LONG time.

Here is the coolest thing about this card... and proof that you really can just use what you have at home.  See those big silver discs in the shaker... those are from a shirt I bought a few years ago, and when they started falling off, I realised I could use them on my cards as embellishments.  So, I saved them.  Then, I started cutting more off the shirt.  It was ruined anyway.   No one will ever know.  Except you and me.  But you're not gonna tell.

I used a rounded rectangle die and a stitched circle die to make the white card panel (using Neenah Solar White cardstock).  Inks are from the one and only Catherine Pooler: It's a Girl and Party Dress.
That's that.  Yes, there is a lot to making this card.  It's so worth it, though.  I used 3M foam tape and Ranger multi-medium matte as my adhesive.
If you are interested in making a shaker card, check out these tutorials. I found them all very helpful!
Catherine Pooler makes a shaker card (10 minute video)
Another Shaker card with Catherine Pooler (7-8 minute video)
Justine Hovey's shaker card (6-7 minute video)
Kristina Werner's shaker card tips (6-7 minute video)

Phew... now for Card #2.

Baby Boy Congratulations Card!


Inspired by this pin

My Mum asked me to make a card for her to send to some friends of ours who have recently become grandparents.  So exciting! She wanted Blue for a Boy.

I used a circle punch and cut two circles.  One from blue card stock and one from blue and white wrapping paper I had in my stash.  I then held them together and cut a triangle shape from both circles using scissors.  I decided the blue and white paper looked a bit odd, so I used an ink blending tool to lightly cover the paper in "Something Borrowed" ink from Catherine Pooler.  This way the paper looks like a two tone blue pattern.  I adhered them off set so the solid blue looks like a trim on the patterned pram/buddy.  I used an embossing folder in my Cuttlebug to emboss a polka dot pattern on a white card panel that was half an inch smaller than my card base.  Then adhered my circles to my card panel and was about to adhere it to the card base when I decided it needed more.
I used the same ink and blended a border onto another white card panel that was an eighth of an inch larger than my main card panel.  I die cut the word Congratulations three times and stacked two of them on top of each other.  I ink blended the third die cut using the same ink, but made it darker at the bottom of the word so it looks Ombre.  That's what I was going for anyway. I then adhered the blended die cut on to the other stacked ones.  Then glued it onto the card under the circles.  I used white buttons for the "wheels" on the "pram".  This one was easy, but had a lot of steps.

Fuurrinally, some Kitty Cards! 

For Aunties' Day this year, I received a set of cat dies!  Puurrty! I also had some cat die cuts that good ol' Aunty Crafty gave me.  So, these were used to make some fun and (I think) gorgeous cat cards.  I used a swipe stamping technique on these cards so my dots would look like little balls of wool or at least look textured.  This technique is demonstrated by Jennifer McGuire in this video.  I was also inspired by the cards on this blog post.  Check these out! Excited much!


The beauty of these cards is that apart from the cat dies, you can use dot and circle stamps from pretty much any other stamp set you have.  You can use bakers' twine, string or yarn along with the cat dies or a stamp that looks long and twisted.  Almost any sentiment would work well, or a cat pun sentiment if you have one.  I love these cards and I will definitely be making more of these.  I would dare say they could be mass produced.  :)

It's simple enough, choose your colour scheme and go a little nuts, or keep it simple.  I stamped onto a card panel and adhered that to my card base, but you could make it an almost one layer card if you like.

Comment with pictures of your own cards for this World Card Making Day.  Remember, it's the thought that counts!

Happy Card making.