The party was a while ago now and hopefully this means I
won’t ramble too much. On the other
hand, I might have forgotten some of the important things I wanted to tell you.
Sorry about that, only, it takes a lot to write a party planning post and I
just didn’t have it in me. I will be
posting in two parts, because it’s just way too long for one week! Here goes.
Theme
My nephew has loved Dinosaurs for more than 5 years. It was a no brainer that his 10th
birthday would have a dino-theme. He was
very specific that he wanted his party to be a “Jurassic World Party” NOT, Jurassic Park… that is so
last decade! So, unlike my Frozen Party,
I had to do a lot of research (watching the movie and using the website was so helpful) before I could start committing to ideas and
finally creating all the wonderful stuff that made the day.
Decorations
I downloaded a printable party pack (that was FREE) from SKGaleana.com including invitations. I didn’t use
all of the pieces in the pack but what I did use worked brilliantly. We used a lot of paper for this party
too. I think we may have killed a couple
of trees to pull this one off. :/ It was simple to print, cut out and laminate
all the name tags, security badges, thank you notes, logos and posters, it just
took a long time. I also copied an image
of the Jurassic World sign so that we could make some awesome signs/ posters of
our own.
The other awesome printable was a template for our
pterodactyls. Click here to check it out.
I also downloaded the Jurassic Park font (click here to get it) which we used for the signs at each activity and party zone.
Let’s give you the tour:
Entry: the gate!
We used cable ties to attach large pieces of cardboard to our wrought iron
gate. Grey plastic tablecloths made the
side pillars (I love my staple gun!). We
made 6 torches from brown paper bags and yellow/orange/red cellophane. The BFF used the A1 printer at her work to
print some supersized logo signs for us.
One was cut in half and stuck on the gate so when it was closed it was
whole. It looked great. The other sign was stuck on the wall of the
house, so kids could get a photo there if they liked. I was so proud of the gate!
Discovery District:
Tubs of sand for kids to dig in, under our clothesline. We hung various leaf shapes on the line and
had some hanging vines (crepe paper and craft paper) draped around so it felt
like a bit of a jungle.
Innovation Centre:
A high camping shelter with folding tables and chairs laid out underneath. There were three activities set up under the
shelter. Each space was signposted.
Main Street: Green Leaves were cut out from a few different
templates (found on my Pinterest board), we used a few different shades of
green paper and card. Pterodactyls were
cut from brown and black cardboard using a template we found online (link above). We printed it and photocopied in three
different sizes so they looked like some were higher in the sky when hung
up. We rearranged my Mum’s pot plants to
line the sides of an alley on our verandah and made a few cardboard palm trees
to bulk it up a bit. Dinosaur figurines
hid among the trees too!
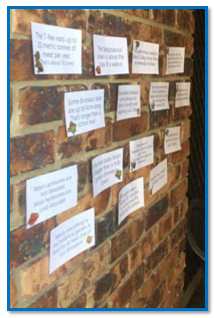
Fact Wall: I made some small posters with random dinosaur
facts and we stuck these along the wall for the guests to read while they were
eating. I used this as a sort of game
when we were running out of things to do.
I asked questions and the kids had to run to the wall to find the
answer. Most of the facts came from the Did You Know? slides on the Jurassic World Website.
Bathroom Entryway: As most of the
activity was outside, we didn’t go overboard decorating inside the house. However, we combined a few ideas from Pinterest to make a
Dinosaur Mouth over the archway that leads to our bathroom. When guests came inside to use the bathroom
they were greeted with this scary sight and then had to walk into the monster’s
mouth to use the facilities! The BFF added her expertise to make it look just right! Thanks Bestie!
That's it for now! Next week I will tell you about the food and the activities that kept the kids busy!


